摘要 阔阔录制的物理小游戏视频教程更新到了 26 集!完结撒花!文章总结下后面部分,去 GitHub 给阔阔点个 Star 就是最大的认可。
正文 使用版本 CocosCreator 版本 2.3.4
视频链接为:https://www.bilibili.com/video/BV1ck4y167mR
GitHub 地址:https://github.com/KuoKuo666/NotLevelTheBowl
碗的眨眼动作(第 15 集) 使用 tween 实现一个永远重复的纹理切换:
cc.tween (this .bowl ).repeatForever ( cc.tween () .delay (2 ) .call (() => this .bowl .getComponent (cc.Sprite ).spriteFrame = this .closeEyeBowl ) .delay (0.3 ) .call (() => this .bowl .getComponent (cc.Sprite ).spriteFrame = this .openEyeBowl ) ).start ()
其中 this.closeEyeBowl 和 this.openEyeBowl 就是对应闭眼与睁眼的图片。
点击下落(第 16 集) 在游戏开始时会用 this.midConfig.node 来指向中心生成的待下落物体,下落逻辑后,将其改为动态类型的刚体,然后给个初速度,因为在检测停止逻辑时使用的是线速度检测,不给与初速度会导致最开始符合“停止”条件。
onClickDownFood ( if (!this .midConfig .node ) { return } PhysicsManager .setRigidBoyDynamic (this .midConfig .node ) PhysicsManager .setRigidBoyLinearVelocity (this .midConfig .node , cc.v2 (0 , -5 )) this .midConfig .node = undefined }
关卡配置信息(第 17 集) 我们有 6 个关卡需要设计,每个关卡对应着要生成的食物,食物可以从 0 开始对应,从 0-5 对应六种食物,采用了一个数组的模式:
const GameConfig = [ [], [2 , 2 ], [0 , 0 , 0 ], [2 , 2 , 1 , 1 ], [5 , 5 , 5 , 5 ], [4 , 4 , 4 , 4 ], [3 , 3 , 3 , 3 , 3 ] ]
根据数据创建食物&关卡信息(第 18-19 集) 在导入这个配置数据后,根据开始游戏时设置的变量,写出这样一个 get 属性,方便的获取食物类型:
import GameConfig from "./config/GameConfig" get nowFoodType (): number { return GameConfig [this .midConfig .level ][this .midConfig .count ] }
在食物完成下落后会改变这个 midConfig 中数量属性,然后渲染到界面上,下面是数据结构类型与渲染逻辑:
interface IMidConfig { level : number , count : number , node : cc.Node | undefined } updateFoodCountUi ( StaticInstance .uiManager .setLevelInfo (this .midConfig .level , this .midConfig .count ) }
判断食物静止&过关条件(第 20-21 集) 其实这个物理小游戏的核心逻辑就是这块了,如何判断所有刚体都静止了,物理系统是有误差的,而且有时在两个动态刚体接触时有可能会抖动,虽然线速度很小,但是不会 ===0,所以这里有个允许的判断误差,食物都在 foods 节点下:
get allBodyStop (): boolean { for (let i = 0 ; i < this .foods .childrenCount ; i++) { const node = this .foods .children [i] const body = node.getComponent (cc.RigidBody ) if (!body.linearVelocity .fuzzyEquals (cc.v2 (0 , 0 ), 0.1 )) { return false } } return true }
判断所有刚体线速度与 0 之间的距离是否都符合要求,如果 0.1 精度不够,可以设置 0.02 左右。然后判断过关的条件就是所有的食物都下落完毕,其实就是相当于所有食物都是动态的刚体即可,因为只要没过关,最上方必然会生成一个新的静态刚体:
get someBodyStatic (): boolean { for (let i = 0 ; i < this .foods .childrenCount ; i++) { const node = this .foods .children [i] const body = node.getComponent (cc.RigidBody ) if (body.type === cc.RigidBodyType .Static ) { return true } } return false }
然后检测系统每 0.2 秒工作一次,进行判断:
update (dt: number ) { this .time += dt if (this .time > this .checkCD ) { this .time = 0 this .checkAllBody () this .checkFall () } } checkAllBody ( if (!this .isPlaying || this .someBodyStatic || !this .allBodyStop ) { return } if (!this .canAddFood ) { this .isPlaying = false this .gameWin () return } this .midConfig .node = this .addFood (this .nowFoodType ) }
胜利与失败逻辑(第 22-23 集) 在 this.checkFall() 这个检测方法中,判断有没有刚体下落到屏幕外,如果有就是失败了,如果一直到最后无静态刚体就是胜利了,根据胜利与失败弹出做好的两个 UI 界面,其中有三个按钮需要处理事件逻辑:
onClickNextLevel ( this .midConfig .level += 1 this .clearAllFood () StaticInstance .uiManager .gameStart (this .midConfig .level ) } onClickPlayAgain ( this .clearAllFood () StaticInstance .uiManager .gameStart (this .midConfig .level ) } backToStartMenu ( StaticInstance .gameManager .clearAllFood () StaticInstance .gameManager .hideBowl () this .showUI ([UIType .StartMenu ]) }
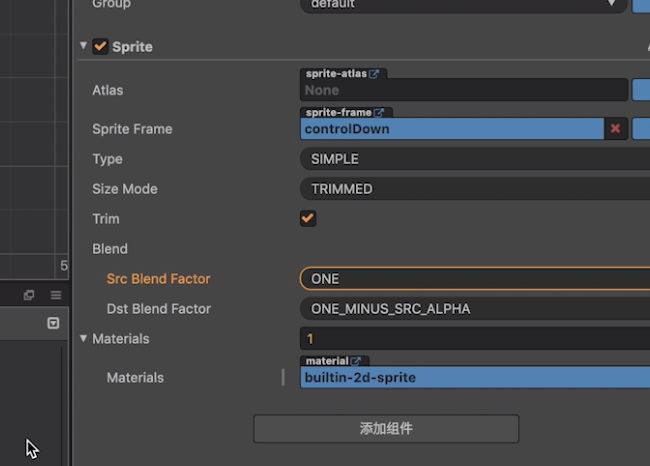
处理压缩后图片黑边问题(第 23 集) 黑边问题相信在压缩带透明图片时大家都遇到过,处理方案是,把图片勾选 premultiplyAlpha 选项,然后在精灵组件混合模式那里改成 ONE,如下图即可:
数据存储模块(第 24 集) 使用了一个 DataStorage 类,暴露存取静态方法,使用了 cc.sys 的内置方法:
static getUnLockLevel (): number { const value = cc.sys .localStorage .getItem ('unLockLevel' ) if (!value) { console .warn ('[DataStorage] getUnLockLevel is undefined, set 1' ) DataStorage .saveUnLockLevel (1 ) return 1 } console .log ('[DataStorage] getUnLockLevel is ' + value) return JSON .parse (value) } static saveUnLockLevel (level: number ) { console .log (`[DataStorage] saveUnLockLevel ${level} ` ) cc.sys .localStorage .setItem ('unLockLevel' , JSON .stringify (level)) }
音频单例管理(第 25 集) 在 TypeScript 中书写单例有几种不同方法,这里使用的是私有化构造函数:
export class MusicManager { private static instance : MusicManager private constructor () { } static getInstance (): MusicManager { if (!this .instance ) { this .instance = new MusicManager () } return this .instance } }
这样使用单例时,通过 MusicManager.getInstance() 来获取即可。在播放音频资源时,采取了放在 resources 文件下异步获取的方法,封装了一个获取方法,返回 promise,这样就可以在使用时用 await 关键字:
static loadMusic (url : MuiscResUrl ): Promise <cc.AudioClip | undefined > { return new Promise ((resolve, reject ) => { cc.loader .loadRes (url, cc.AudioClip , (error, audioClip ) => { if (error) { console .error ('[Util] loadMusic error' ) resolve (undefined ) } resolve (audioClip) }) }) } private async playBGM ( const audioClip = await Util .loadMusic (MuiscResUrl .Bgm ) audioClip && cc.audioEngine .playMusic (audioClip, true ) }
结语 走过了两个月,从视频录制到剪辑与配音,实属不易,但还是坚持下来了。希望大家在看过视频后能有所收获,阔阔会继续学习分享知识的,哔哩哔哩求关注,然后 GitHub 希望能给点个 Star !
视频链接为:https://www.bilibili.com/video/BV1ck4y167mR
GitHub 地址:https://github.com/KuoKuo666/NotLevelTheBowl
2020!我们一起进步!O(∩_∩)O~~
微信公众号